2.4. Setup workstation
2.4.1. Database configuration
To tell a workstation, where the database is (on the local system or on a network server) you will have to create some files initially on every device on which you will have QGIS/QGEP running (client). It is not required to do that on the server itself.
These instructions depend on your operating system.
2.4.1.1. Windows pg_service
Create a new directory where you want to store the configuration in. (E.g. a new folder pgconfig in your home folder). This directory will be referred to as PGSYSCONFDIR in this guide.
Set the environment variable PGSYSCONFDIR to the path to PGSYSCONFDIR.
Note
Search for environment variable in your windows system settings, then click one of the following options, for either a user or a system variable:
Click
Newto add a new variable name and value. Click an existing variable, and then clickEditto change its name or value. Click an existing variable, and then clickDeleteto remove it.

You can check your environment variables also within QGIS: Menu Settings –> Options... –> System Tab –> Environment
Inside this folder, there will be two files
pg_service.confpgpass(If you do not want to enter the password for the db every time)
Attention
On Windows, you need to save pg_service.conf in Unix format in order to work.
One way to do it is to open it with Notepad++
and Edit –> EOL Conversion –> UNIX Format –> File save .
2.4.1.2. Linux/macOS pg_service
On Unix systems (linux/macOS etc.) you may put the files .pg_service.conf
and .pgpass into your home folder (normally /home/[username]). Pay attention to the starting . (<> Windows)!
If your QGIS doesn’t find the .pg_service.conf file, set the environment variable PGSYSCONFDIR:
In QGIS go to Settings > Options > System tab. Near the bottom you’ll find Environment. Tick Use custom variables and click on the plus on the right. Add the PGSYSCONFDIR variable using Append (to make sure you don’t delete anything - doesn’t matter probably) and its value (probably /home/[username] see above). Then click OK at the bottom right.
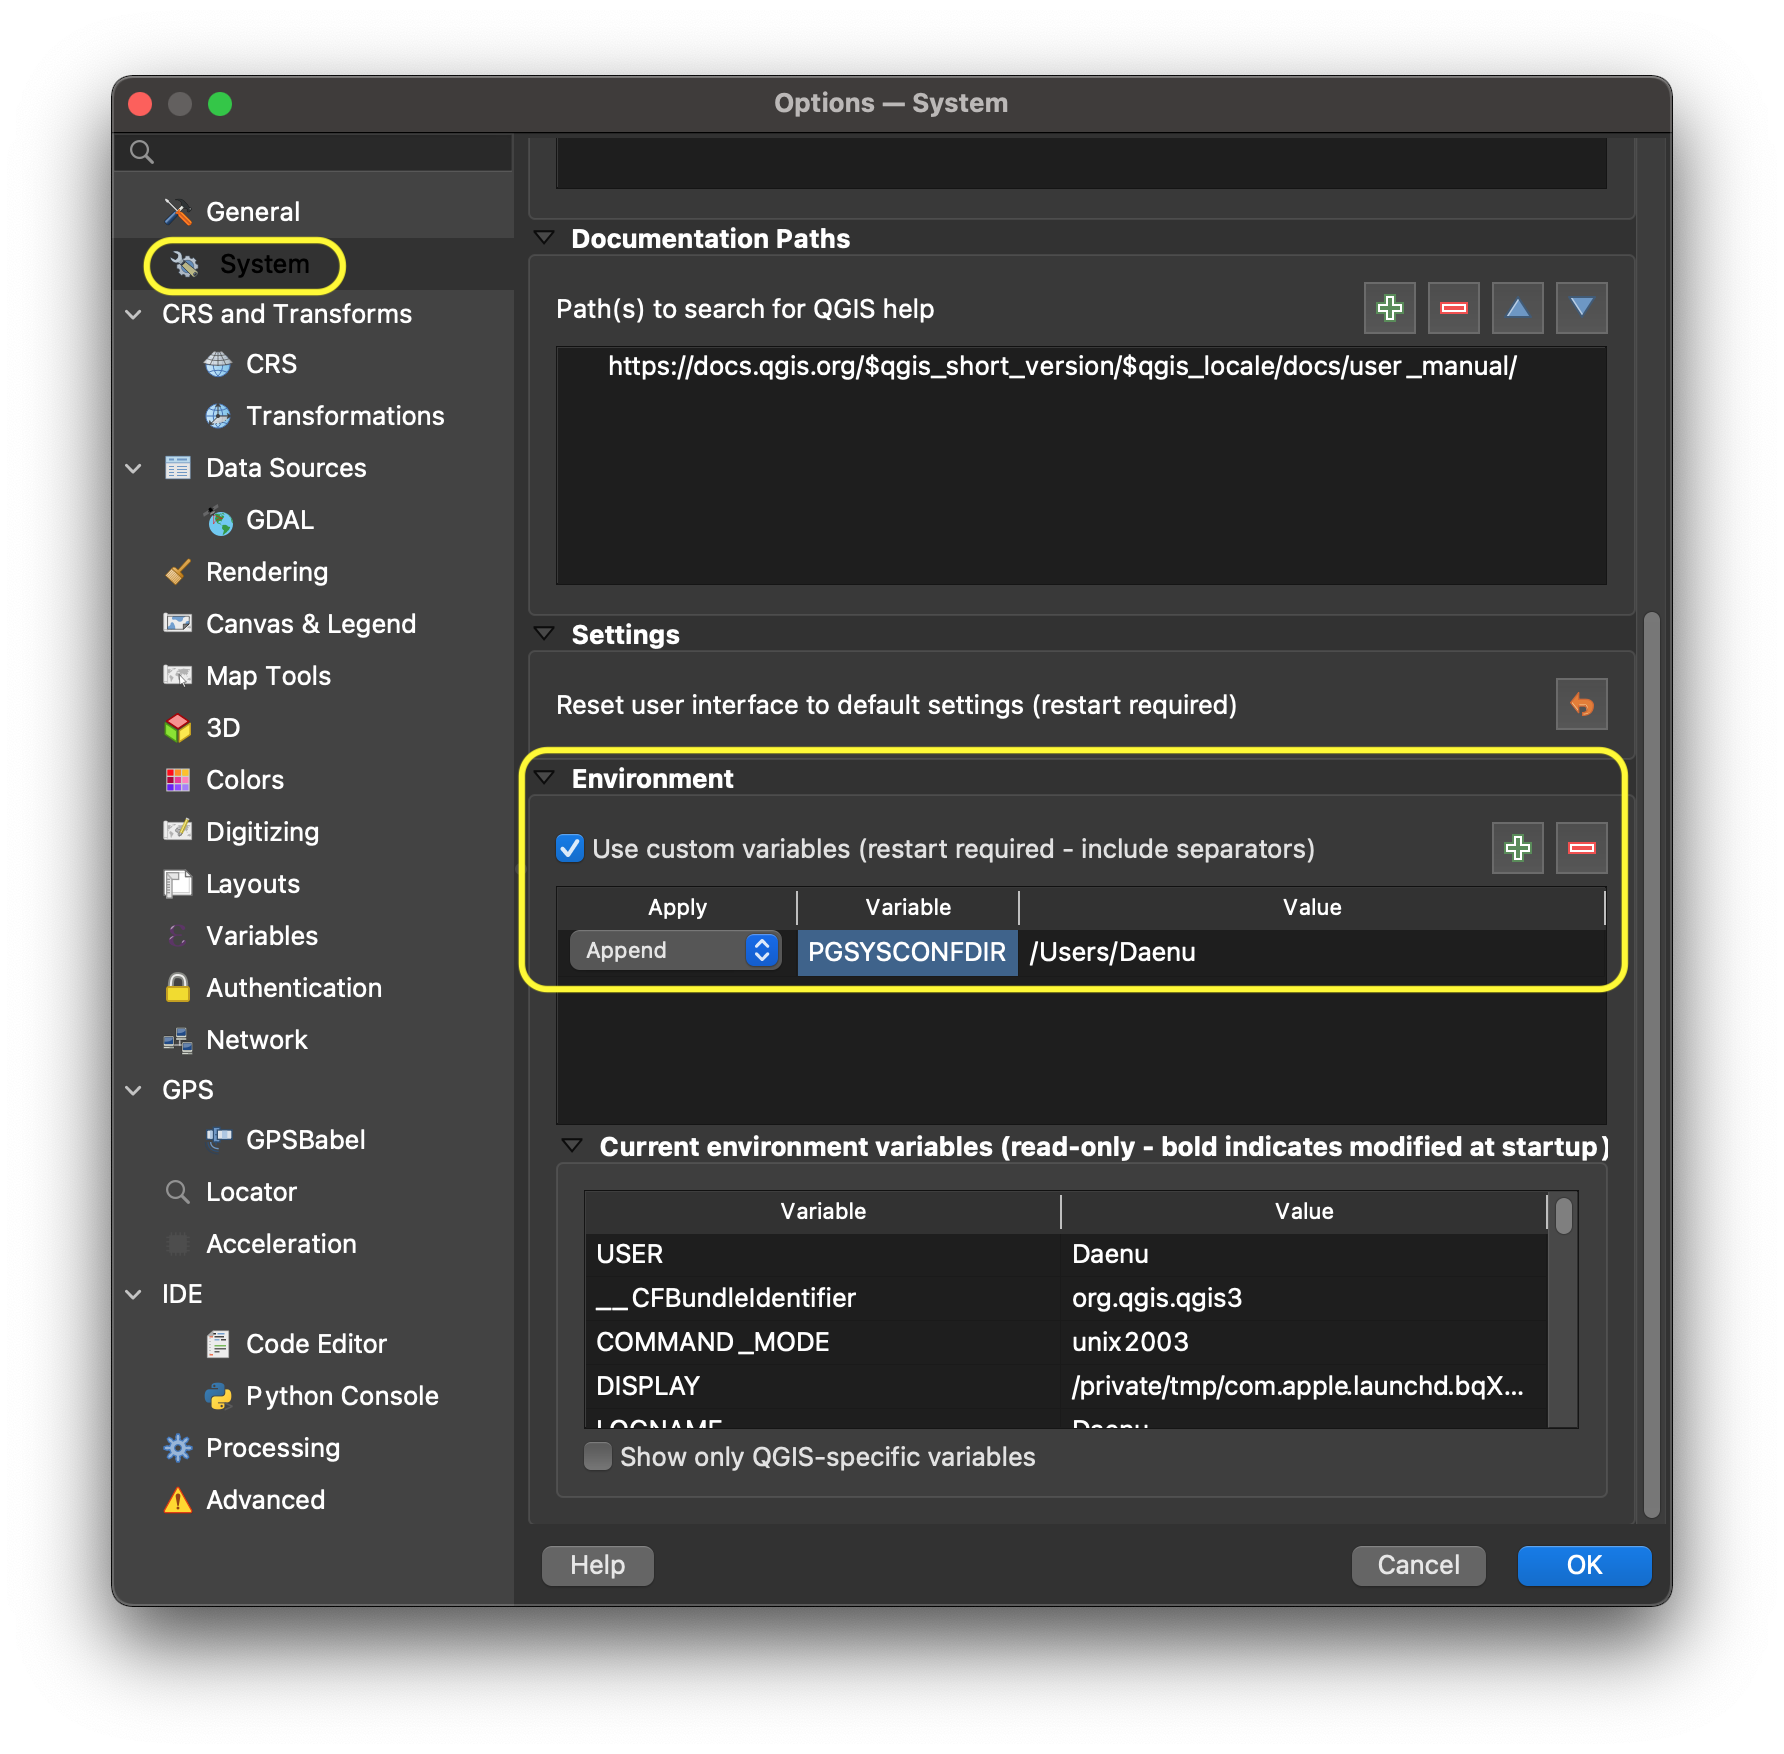
After closing and reopening QGIS, you should be able to see the added PGSYSCONFDIR at the bottom of the same window under Current environment variables.
.. figure:: images/macEnvVarCheck.png
2.4.1.3. All systems
Put the following content in the file pg_service.conf or .pg_service.conf.
You may have to adapt the variables for your setup.
[pg_qgep]
host=localhost
port=5432
dbname=qgep
user=qgepuser
To save the password as well on the system you may use the file pgpass.
localhost:5432:*:qgepuser:password
Note
If you don’t have the database on your local machine replace any
occurence of localhost with the network address of your database
server.
Alternative: put your password directly into the pg_service.conf (on Windows) / .pg_service.conf (on *nix) file:
[pg_qgep]
host=localhost
port=5432
dbname=qgep
user=qgepuser
password=***
2.4.2. Install QGIS
Minimum requirement 3.4
We recommend using the latest master build (called qgis-dev on Windows) which often offers a better experience in combination with QGEP. For Windows installation, download the OSGeo4W Installer choose advanced installation and install qgis-dev.
2.4.3. Install QGEP plugin
Plugin requirements:
networkx >= 2.1
You can install them on Debian based systems with:
sudo pip install networkx
sudo apt-get install libqt4-sql-psql
Or for Windows users, directly in QGIS via the Python Console with:
import pip; pip.main(["install", "networkx"])
Open QGIS
Go to
PluginsManage and Install PluginsSettingsEnable
Show also experimental plugins
Activate the plugin (see image below):
All
Search QGEP
Click the checkbox next to it
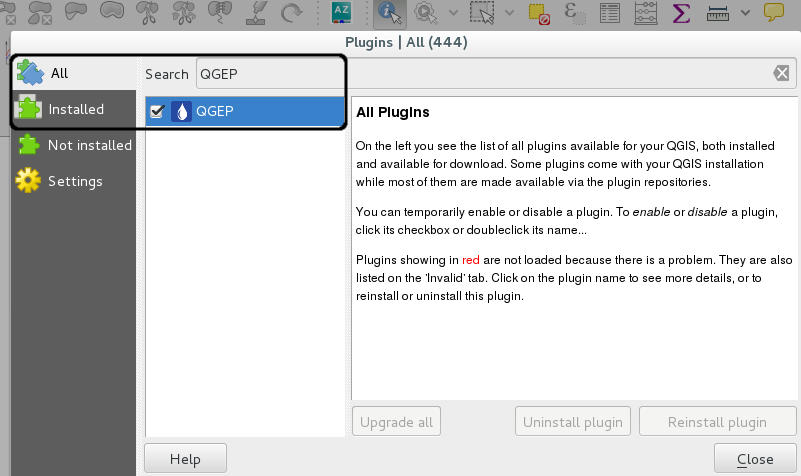
Add the QGEP plugin
QGEP uses a data historization process. The pg history viewer plugin allows you to view the changes made and replay some of them.
2.4.4. Install the demo data
as described here
2.4.5. Install the demo project
Download from https://github.com/QGEP/qgep/releases/latest the qgep.zip
Extract the file
If you leave the qgep_[language].qm files in the same directory as the qgep.qgs file and start QGIS with one of these languages, your qgep-project will be translated to that langue when you start the project. E.g. you start qgep.qgs with a QGIS Installation that is set to German, then the qgep.qgs project will appear in German.
Note
You need to explicitly set the language in QGIS in settings. If QGIS is configured to take the system language, the QGEP translation is not loaded.

Open project/qgep.qgs with QGIS
When you save that project it will keep it’s language and it cannot be changed in the same way.
2.4.6. If you are a data owner: Add your own OID to the project
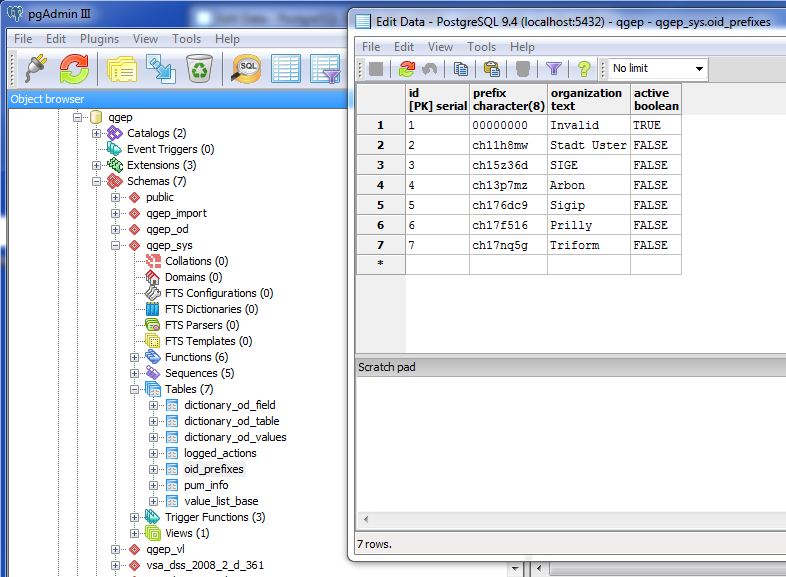
If you are a data owner (Datenherr), you should add your OID data in the table qgep_sys.oid_prefixes:
Edit
02_oid_generation.sqlwith your OID if you want it permanently in the QGEP project and hand in a pull request
https://github.com/QGEP/datamodel/blob/master/02_oid_generation.sql
-- sample entry for the City of Uster - you need to add an entry for your own organization
INSERT INTO qgep_sys.oid_prefixes (prefix,organization,active) VALUES ('ch11h8mw','Stadt Uster',TRUE);
INSERT INTO qgep_sys.oid_prefixes (prefix,organization,active) VALUES ('ch15z36d','SIGE',FALSE);
INSERT INTO qgep_sys.oid_prefixes (prefix,organization,active) VALUES ('ch13p7mz','Arbon',FALSE);
and set the OID you want to use in your project to TRUE.
or add it locally to your project with an INSERT statement.
OID prefixes have to be ordered at https://www.interlis.ch/en/dienste/oid-bestellen
Note
If you work with different databases for different communities, you should use different OID prefixes for each database.
2.4.7. Working with more than one database
Create a new database in pgAdmin with a new name, e.g. communityA
Create a new schema qgep in this database (do not choose another name, because all scripts works with the schema-name qgep)
Go further on as described in 1.2 Database initialization
Change the
pg_service.conf- file
[pg_qgep]
host=localhost
port=5432
dbname=qgep
user=qgepuser
[pg_communityA]
host=localhost
port=5432
dbname=communityA
user=qgepuser
Search and replace in the copy of
qgep_en.qgsall ‘pg_qgep’ with ‘pg_communityA’